How To Make Concrete Planter: DIY Concrete Planter
There’s something about simple, straightforward混凝土种植者boxes that appeals to many people regardless of their style preferences. You’ll be happy to learn that thissimple DIY ideaonhow to make concrete planteris not only fast, but it’s quite cost-effective and easy. That’s a win-win-win.
Let’s get started, so you’re ready for the planting season.
 在画廊中查看
 在画廊中查看
DIYConcrete Planterfor Beginners
 在画廊中查看
Materials Needed:
- Four (4) equal-sized, straight-edged concrete pavers (12” squares were used in this project)
- Landscape adhesive
- ardex羽毛饰面(未显示)
- Concrete sealer
- Potting soil & plants
Step 1. Choose the right working space for your DIY混凝土种植者box项目。
 在画廊中查看
Begin your project on a clean, flat surface outside.
如果可能您的混凝土种植者box干燥。
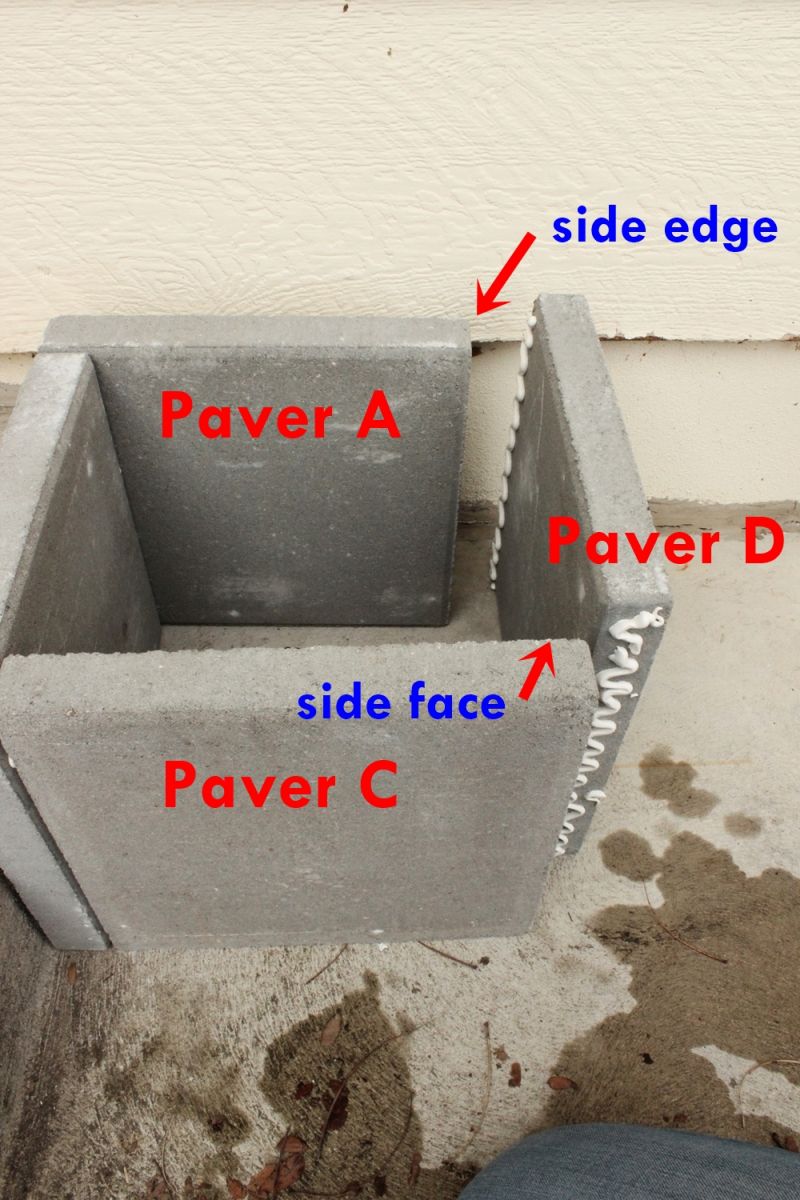
Set your first concrete paver (Paver A) on its side, propped next to the step for support.
步骤2.正确应用粘合剂。
 在画廊中查看
一个pply landscape adhesive to the side edge of your second concrete paver (Paver B).
建议使用ZIG-ZAG应用来巩固粘合键强度。
Step 3. Glue the pavers together.
 在画廊中查看
将摊铺机B的粘合边缘靠近摊铺机A的侧面。
将它们的比对尽可能接近90度角。
 在画廊中查看
将边缘和脸部固定在一起, pushing them tightly into each other.
 在画廊中查看
Try to keep a 90-degree angle here, but don’t stress about it yet.
您将稍后确定角度。
笔记:但是,一个原因之一是为什么要使用附近的任何垂直面很有帮助 - 这是帮助播种机坚实地保持直立的,而不必担心它在粘合剂仍然很新鲜时会掉落。
 在画廊中查看
一个pply landscape adhesive to the side edge of your third concrete paver (Paver C), and push it firmly into the side face of Paver B.
一个gain, do your best to maintain 90-degree corners, but don’t be too precise quite yet.
笔记:If you want to end up with a true square混凝土种植者, it’s important to pay attention to the attachment of the side edges to the side faces so all sides end up equal.
The same thing applies if you’re looking to build a perfectrectangle concrete planter。
 在画廊中查看
Grab your fourth concrete paver (Paver D) and apply landscape adhesive to one side edge and also to the opposing side face.
将粘合剂的锯齿形扎在侧面的尺寸/宽度与侧面边缘的粘合剂的大小/宽度相同 - 这并不难,因为您现在可能会感觉到它。
 在画廊中查看
对付摊铺机D,以便(1)胶合边缘将压入摊铺机C的侧面,并且(2)胶合面将压入摊铺机A的侧面。
 在画廊中查看
When all sides are pressed firmly together, square off each corner to a perfect 90 degrees.
When the混凝土种植者boxis squared off and secure, leave it alone for at least 24 hours, or until the landscape adhesive cures and dries completely.
 在画廊中查看
Optional:Carefully transfer the混凝土种植者盒to a gravel workspace so the Ardex feather finish won’t mar any existing concrete surfaces.
Step 4. Prepare the feather finish mixture.
 在画廊中查看
根据包装说明混合羽毛饰面。
 在画廊中查看
 在画廊中查看
For each concrete planter box, I used a mixture of about 3 cups of powder with about 2 cups of water.
 在画廊中查看
 在画廊中查看
Stir it up.
 在画廊中查看
There is slightly more water than the instructions call for; play around with your ratios to get a good peanut butter-like consistency.
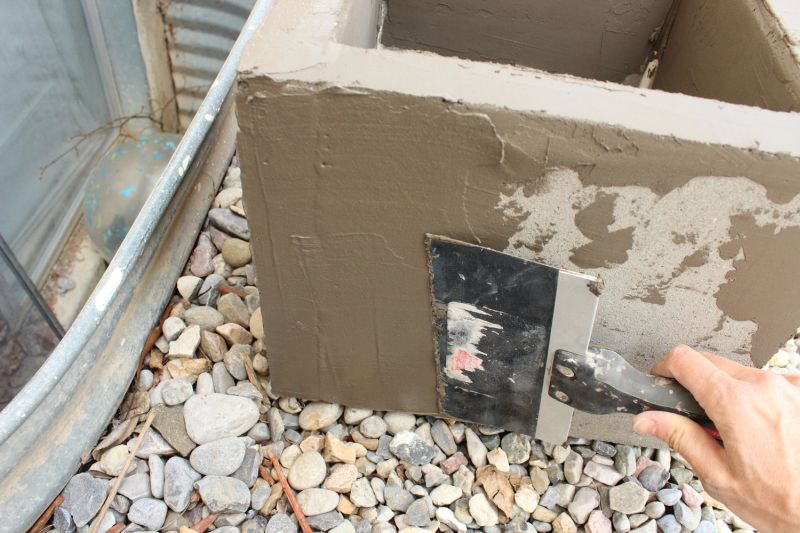
Step 5. Apply the feather finish on your roughDIY concrete planter box.
 在画廊中查看
一个pply the feather finish freely to the exterior faces, tops, and upper half or third of the interior faces of your concrete planter box.
Step 6. Make sure to cover the inside corners of yourDIY concrete planterfor a seamless finish.
 在画廊中查看
首先在内角上涂一些羽毛饰面。您的目标是覆盖接缝和粘合剂。
 在画廊中查看
 在画廊中查看
Load your spreader with a feather finish.
 在画廊中查看
一个pply to the inside wall’s top half (or top third).
 在画廊中查看
 在画廊中查看
重复其他内部和墙壁,然后移至播种机的四个顶部边缘。
Step 7. Fill in the crack on the outside.
 在画廊中查看
在外墙上,首先填充粘合剂裂纹。
 在画廊中查看
为此,请从上到下在裂缝上水平地工作。
 在画廊中查看
向墙壁的中心锻炼多余的东西。
Step 8. Cover the entire outside surface of your concrete plant pot with the feather finish mixture.
 在画廊中查看
当覆盖粘合剂裂纹附近的表面时,请垂直工作以使粘合剂裂纹光滑。
If you go horizontally over this, your spreader will always dip slightly into the crack.
您的最后一遍应该是垂直的,以使裂缝消失。
 在画廊中查看
继续在外墙周围工作羽毛饰面,并根据需要为您的撒布机增加更多。
 在画廊中查看
一个dd additional feather finish to the corners; you can always sand these down a little later.
It’s better to have more, with a solid covering on the corners, than less.
Step 9. Smooth the walls of yourDIY混凝土种植者。
 在画廊中查看
将整个墙壁抚平到您的口味。Some people prefer a really raw concrete finish (very industrial), while others prefer more subtle ones.
 在画廊中查看
运行您的撒布机decrea多个方向se bubbles and increase interesting spreader lines.
 在画廊中查看
Loosely check your corners and edges from multiple angles here; if you want to smooth them out a bit, go ahead.
 在画廊中查看
Keep in mind, though, that too much messing around with the feather finish can make things look worse.
You’ll be able to sand away rough corners and edges after it dries, too.
 在画廊中查看
如果发现有用的话,您甚至可以用手指平滑角落。
 在画廊中查看
Of course, it’s up to you and your preference, but I would recommend that you don’t be too careful about smoothness here.
 在画廊中查看
留在一些抹子线上会给混凝土种植者带来更多的特征,我们倾向于喜欢的工业美学。
 在画廊中查看
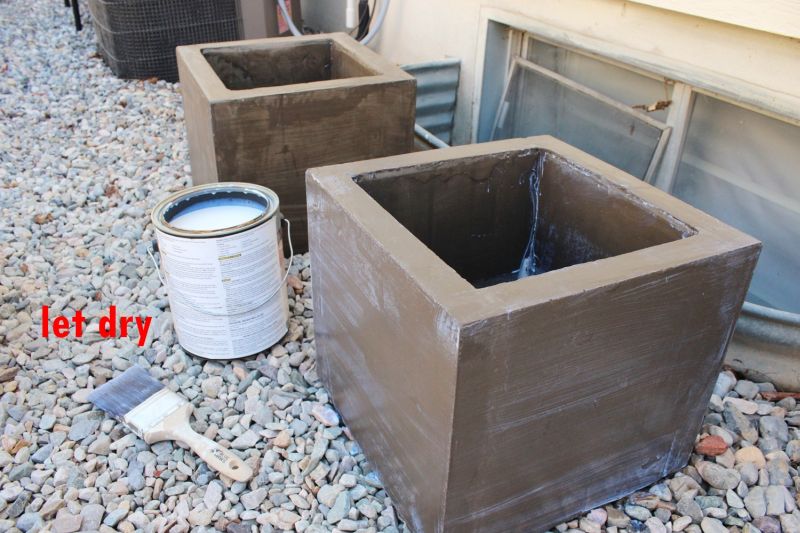
Let the feather finish dry thoroughly. Touch up as needed.
步骤10.打磨整个表面以达到完美的表面。
 在画廊中查看
砂grit sandpaper if you want; this isn’t necessary, though.
 在画廊中查看
It simply depends on your preferences for raw industrialism aesthetics – the rougher your混凝土种植者boxis, the more industrial it will likely look.
Step 11. Apply concrete sealant.
 在画廊中查看
Choose a concrete sealant that is designed for exterior use.
 在画廊中查看
密封胶可能会带有蓝白色的色调,类似于脱脂牛奶或类似的牛奶。
一个lthough perhaps disconcerting, don’t worry about this; when it dries, the sealant will be completely clear and glossy.
 在画廊中查看
Sealing is rather easy; however, this stuff tends to dry fairly quickly, so your application time might be limited.
We recommend a system that will allow you to seal the entire planter box strategically and eliminate, or at least minimize, unnecessary drips of sealant.
Start with a generous swipe across the top surface of one side. Ignore the dripping down the sides for a minute.
 在画廊中查看
Seal the inside of the planter box on that side, beginning with the two affected corners and then covering the inside wall between them.
 在画廊中查看
Then move to the outside wall on that same side of your planter box, and seal the entire thing.
Look briefly on both adjoining sides for noticeable drips and wipe them away before moving on to the next side.
 在画廊中查看
Repeat this method for all four sides; then do a final once-over for any lingering drips of sealant.
步骤12.让密封胶完全干燥。
 在画廊中查看
让整个东西彻底干燥。
然后将其翻转并密封底部边缘 - 不是为了混凝土摊铺机本身,而是针对底部边缘的羽毛饰面的最边缘,而羽毛饰面可能还没有有效密封。
This will help to prevent moisture’s creeping up through the feather finish from the ground when it rains or whatever.
 在画廊中查看
Place the concrete planter boxes where you want them.
 在画廊中查看
In this instance, two concrete planter boxes flank the ramp-up to a backyard shed.
 在画廊中查看
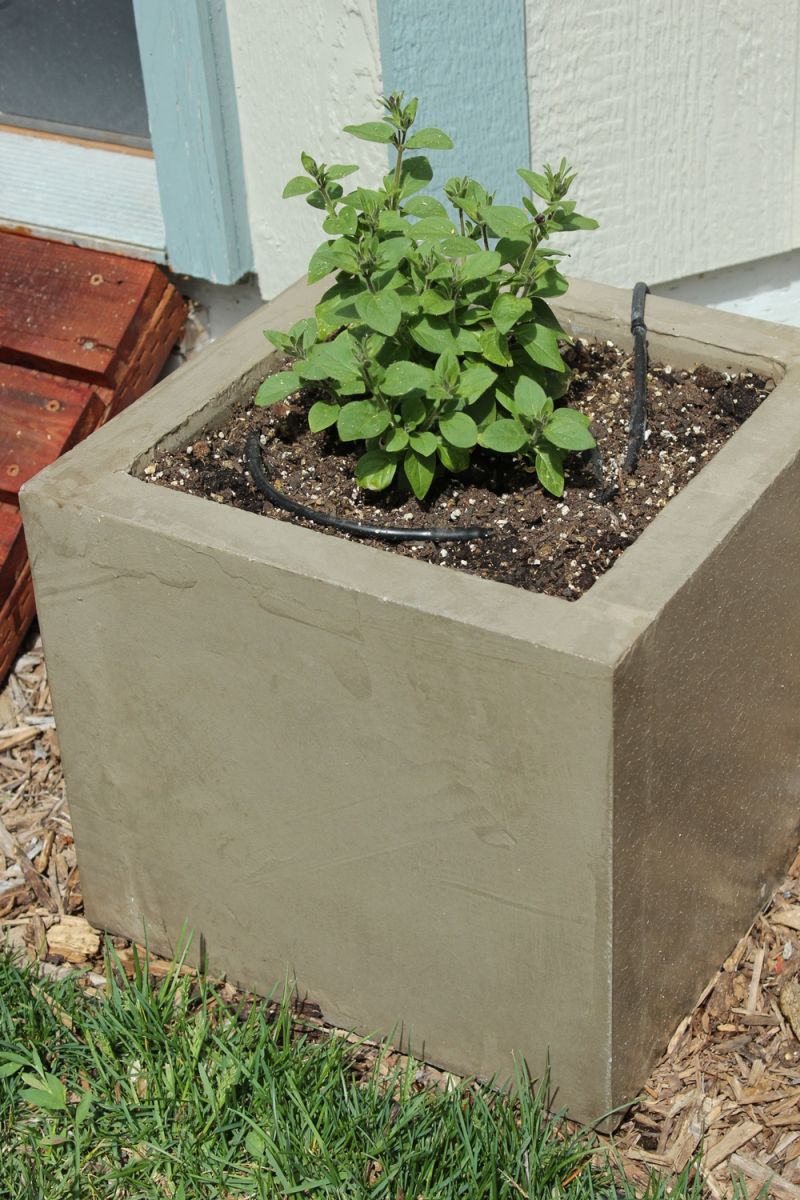
填充盆栽土壤,并添加您的植物,无论它们可能是什么。
示例显示了每个混凝土播种机上的单个潮汐矮牵牛。在短短几周内,矮牵牛就会填满顶部空间,使其成为one of the best plants for concrete planters.
 在画廊中查看
确保添加水源,例如洒水器或滴水系统,或注意每天给植物浇水。
一个ny growing thing planted above ground will dry out faster than plants in the ground itself, due to increased wind and heat effects on the pot itself and, consequently, the soil.
 在画廊中查看
It’s such a cool, crisply industrial look for such little cost and effort.
 在画廊中查看
We love the contrast of a bright flowering plant with the gray concrete of the simple planter box. Beautiful.
 在画廊中查看
而且,如果您要制作一个,我强烈建议同时至少制作两个。
常见问题(常见问题解答)FAQ
混凝土种植者对植物有益吗?
While planting in concrete blocks is usually done with succulents, concrete planter boxes are generally considered to be one of the best options for potting plants as they are to a moderate extent, porous.
This characteristic of concrete planter pots allows just enough moisture to get through.
我可以做自己的混凝土种植者吗?
绝对没错!您只需参考上面的快速简便的教程,涉及如何制作混凝土种植者。
混凝土种植者会吸收水吗?
Technically speaking, concrete plant pots do not absorb water- them being somewhat porous only allows some moisture or water to get through.
我可以用混凝土填充种植者吗?
Instead of filling a planter with concrete, the best thing to do is to just cover the sides of the planter with concrete to make it more sturdy.
Do concrete planter boxes need drainage?
It’s better to put a hole for decent drainage on your concrete planter pot since having proper drainage is ideal for potted plants.
Can I put concrete in a ceramic planter?
If you’re planning to use your ceramic planter as a concrete planter mold, then putting concrete in it is perfectly okay.
Can you put concrete in a plastic planter?
您可以用作混凝土种植者模具的不同物品,而塑料种植者就是其中之一。
If you’re looking to DIY your concrete plant pots, then filling a plastic planter with concrete for molding purposes will do.
How do you make a concrete planter at home?
如果您是想在家中创建自己的户外混凝土种植者,本文中展示的教程是最简单的指南之一。beplay平台没信用
How do you make a decorative concrete planter?
There are a lot of ways to spruce up your regular concrete planter.
其中之一是用鲜艳的混凝土花盆涂料涂上混凝土花盆。另一个想法是,使用混凝土种植者模具,以各种形状(例如圆形混凝土种植机)创建混凝土种植者。
You can also use an old piece of towel and dip it in a concrete mixture for a fun-shaped concrete planter. You just need to let the towel sit on top of an inverted pail and allow the concrete to dry completely.
Conclusion
一个混凝土种植者is a great item for your home, especially if you like being creative and aren’t afraid to get your hands dirty. Be sure to follow this guide to make an awesome混凝土种植者boxthat will surely give your home a unique and beautiful new addition.