DIYFramed Map Corkboard Bulletin
成为一个总是很高兴的井井有条,做到这一点的方法是在鼓励和培养组织周围围绕着零件。公告委员会是增加组织的一种方法。They can be quite unsightly, though, so I’ve found a gorgeous way to create a framed map bulletin board, from scratch, that you can use as a regular bulletin board or one that will help you keep track of your traveling adventures and goals.
 在画廊中查看
 在画廊中查看
ThisDIY项目并不难, particularly, but it does require precision and patience. Mostly, I love the idea of creating a framed piece from scratch. Let’s do it.
 在画廊中查看
DIYLevel: Intermediate
 在画廊中查看
Materials Needed:
- Map of choice (example uses 24”x36”)
- 拟合地图尺寸的软木塞
- 1/2“胶合板切成地图的尺寸
- 1英寸右角饰板,与地图周长和倾斜切割有些额外的额外
- 选择的颜色喷漆 +底漆(示例使用naivete)
- 木胶
- MITER SAW,指甲枪,3/8“ Brad Nails(未显示)
- Craft glue, foam brush, plastic spreader (not shown)
 在画廊中查看
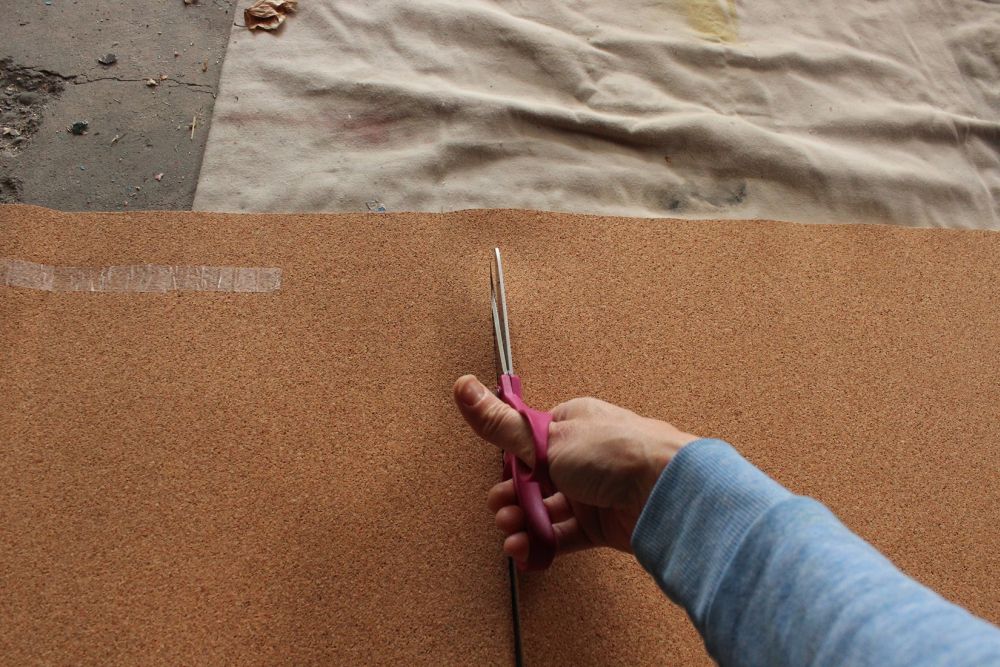
确保您的地图,软木塞板和胶合板都减少the appropriate dimensions. You can trim your corkboard with scissors (depending on its thickness).
 在画廊中查看
我建议确保剪切的剪裁比胶合板板略小,四面不超过1/8英寸。
 在画廊中查看
抓住一个直角饰板。
 在画廊中查看
使用斜切锯在直角饰物的一端创建一个45度角的边缘,注意将装饰完全冲洗到SAW指南上,以进行精确切割。
 在画廊中查看
将装饰件的角度放在胶合板板的较长角度之一上。(提示:从较长的末端开始进行切割;这样,如果在机会上您有点切割,您可以将同一件装饰品用于较短的末端。这种方式的浪费更少。)
 在画廊中查看
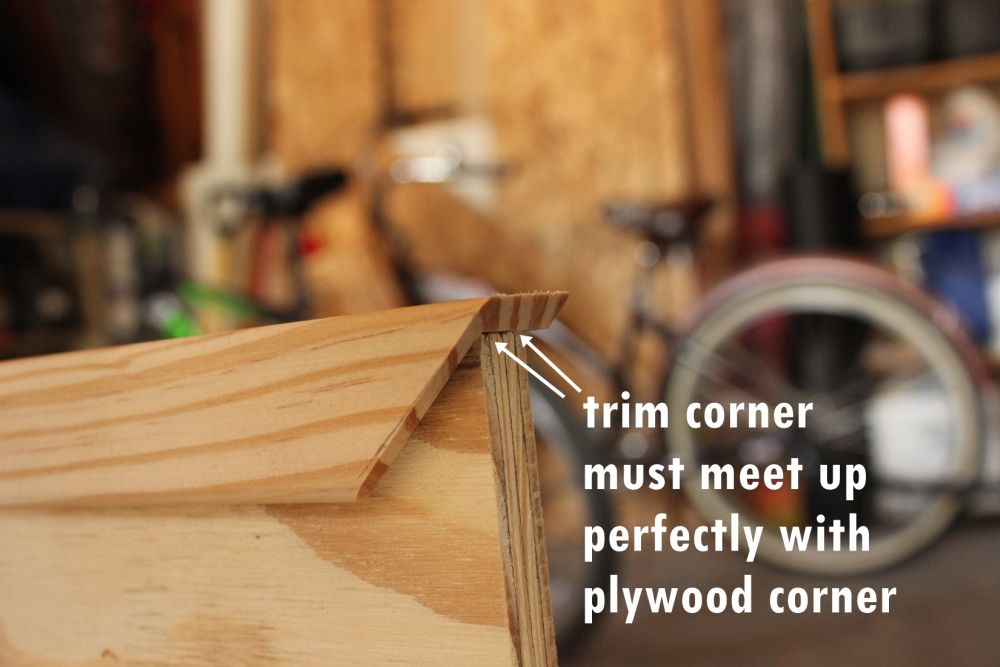
我称之为“关键点”,装饰件的内角与胶合板的角落相遇。当您移动到另一端并将其标记进行切割时,您需要在修剪的一侧保持精确性。
 在画廊中查看
Ensuring the first critical point is still maintained, use a sharp pencil to mark the critical point on the inside of the other corner. Also make a quick angled sketch line in the direction that your angle should be cut. This is so helpful when you move the trim piece away from the plywood and to the saw, so you don’t have to remember and/or guess.
 在画廊中查看
Position your trim piece on your miter saw so that the inside edge of your saw blade will cut ever so slightly outside your critical point mark. (And isn’t that angle sketch line helpful so you know exactly how to position the trim piece on your saw to begin with? Answer: Yes. Yes it is. So helpful.) You always want to err on the side of slightly too big, even up to 1/8”. Chances are, you’ll think you’re leaving too much space but it will end up perfect. And, even if it’s not perfect, you can always shave a little off the end. That’s not possible if your cut is 1/8” too short. So, if you’re going to err, err wisely.
 在画廊中查看
Test-fit your trim piece. Line up the critical point on one side.
 在画廊中查看
Then check the critical point on the other end of your trim. If they both align perfectly – at the same time – then you’ve got yourself a perfect piece of your frame.
 在画廊中查看
Take your trim piece to your miter saw and trim off one end to the appropriate 45-degree angle. (You’ll find that the existing angle, although 45 degrees, is pointing the wrong way.) Then repeat the stepsto cut all the other sides of your frame.
 在画廊中查看
注意:与简单地用胶带测量相比,有些人可能发现这种测量方法效率低下。确实,可能需要花费几分钟的时间,但是我发现(对于像我这样的业余Diyer来说)的准确性要大得多,要比试图衡量以使关键点完美得多要大得多。
 在画廊中查看
当您的四个侧面完全合身并切割时,是时候绘画它们了。将它们放在地面上(纸杯摊位很棒)。
 在画廊中查看
Grab your喷漆+底漆of choice. For this project, I’m trying out Valspar’s Naivete, a very slightly off-white color that seems softer than regular White.
 在画廊中查看
Working in light strokes, spray paint the trim pieces in multiple light coats. Don’t forget to hit the edges of your pieces with paint. These are hard to see from this angle. This might have to be done when the first few coats have dried and you can flip the trim pieces to see the under-edges.
 在画廊中查看
While your trim pieces are drying, it’s time to attach your corkboard and map to the plywood. Spread out plenty of wood glue onto your plywood.
 在画廊中查看
使用平坦的塑料边缘将其均匀均匀地铺在板上。快速工作,因为木胶实际上开始变得相对较快。
 在画廊中查看
When your glue is spread evenly, it’s ready for the corkboard.
 在画廊中查看
Carefully spread your corkboard over the plywood, and center it. Smooth it flat, starting in the center of your board, and place flat objects on the edges if they want to curl up. (This is probable if your corkboard came as a roll.)
 在画廊中查看
当木胶干燥时,您可以将地图应用于软木塞,以便两种粘合剂可以一起干燥。节省时间。将工艺胶与水混合约2:1的比例。您希望胶水流鼻涕,但不要过分水,因为太多的水可能会皱纹和/折腾地图。
 在画廊中查看
用泡沫刷轻轻地将水状胶水撒在地图的背面或在您的软木塞上。当整个表面覆盖时,翻转并将地图放在软木塞上。轻轻地用手轻轻地!- 平滑所有可能形成的皱纹,从地图的中心向外朝边缘工作。将胶水混合在上面放上盖子;您需要一点。
 在画廊中查看
If possible, place some clean, flat boards on top of your map and weight them down. This will help the map’s edges dry in place enough in a smoothed-down position, not curling.
 在画廊中查看
在您满意地图不会移动任何地方(胶水不必完全干燥)之后,是时候密封地图的前面了。在这一点上,您的地图看起来可能会颠簸,但请放心。在您用一些胶水“绘制”前部之后,它会使自己变平。
 在画廊中查看
现在使用相同的胶水/水混合物,然后使用它在地图的前部“涂上”。小心,因为您的地图可能有点颠簸,不要以撕裂或涂抹它们的方式将泡沫刷拖到那些颠簸上。
 在画廊中查看
从不同角度查看您的“油漆”工作,以确保您不会缺少任何区域。在您覆盖的胶水和未覆盖的区域的区域将有所不同。覆盖整个表面。这将使地图的前后两侧同样湿润,这意味着当胶/水混合物干燥时,您的地图将均匀地拧紧并变平。让地图完全干燥。
 在画廊中查看
现在是时候添加框架了。精确地将顶部装饰件放置在地图的顶部边缘,将两个关键点在拐角处对齐。用指甲枪将饰物固定在胶合板所在的装饰片(大约向下)的位置上的位置。
 在画廊中查看
您不必为Brad指甲发疯。我分开了大约6“ -8”。
 在画廊中查看
将顶部装饰件钉在地图上,抓住您的侧面装饰件之一,并对齐关键点。
 在画廊中查看
希望您的关键要点将完美匹配,这意味着您在顶部装饰件之间的角关节,而这侧装饰件也可以很好地对齐。将侧面装饰钉在适当的位置,并继续在地图周围进行工作。
 在画廊中查看
接下来,要获得更多的安全性,您可以沿着装饰件的前侧钉几个钉子。您不想要太多这些;沿较短的装饰片,沿较长的零件大约有四个大左右。
 在画廊中查看
拿起一些轻巧的散布,以填补布拉德钉子留下的孔。
 在画廊中查看
填充装饰片的侧面和顶部的孔。如有必要,您还可以填补出现在角接缝处的任何细微空白。(提示:如果您的散布与油漆不匹配,则可以在一次性的塑料盖或纸板上喷洒一小块喷漆,或者使用泡沫刷直接在干燥的小包上涂抹液体喷漆。
 在画廊中查看
To mount your framed corkboard map, find two studs at the height you want to hang it. Use a level to determine where to place your mounting nails.
 在画廊中查看
砸在指甲上。
 在画廊中查看
Choose your hanging mounts.
 在画廊中查看
提示:因为这种框架方法会在框架地图公告板的背面产生轻微的“唇”,因此您需要选择一个具有稍微灵活性的悬挂式安装座,从深度方面。这就是为什么稍大的D形悬挂式安装座是理想的,其旋转悬挂功能。
 在画廊中查看
在地图背面上标记坐骑应走的位置(与墙指甲对齐),然后连接悬挂的安装座。
 在画廊中查看
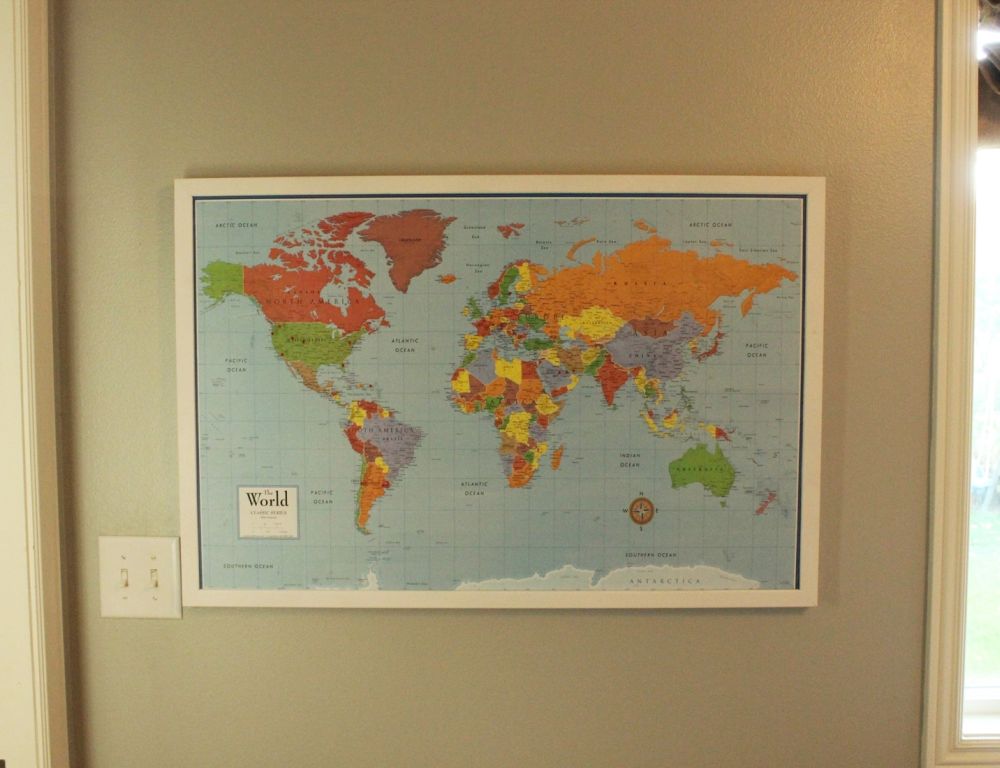
挂上您的DIY框架地图公告板。你完成了!
 在画廊中查看
It really looks great; the frame is a polishing feature but not distracting.
 在画廊中查看
您能看到在干燥胶/水混合物后,地图如何变平?重要的是,不要害怕并在湿时努力将其弄平;您可能最终会造成的弊大于利。
 在画廊中查看
Our family has had such a fun time pinning a few of our favorite places we’ve gone in the world.
 在画廊中查看
The clean-lined frame gives a classic map a contemporary, custom feel, which I like.
 在画廊中查看
The corkboard on this map is very thin, so pins don’t go in very far; but they seem to work fine for our purposes. You can opt for a thicker corkboard if you’re concerned about this.
 在画廊中查看
我们希望您彻底享受您的DIY框架地图公告板!开心!