How To Install Subway Tile Backsplash
Are you wonderinghow to install subway tile backsplashin your kitchen?Subway tile既是classic and contemporary and can add a whole new look to the space.
 View in gallery
Installing a subway tile backsplash into your kitchen提供更新的外观(永远不会过时)和中性外观。你猜怎么着?做自己很容易!我们将向您展示如何在此步骤教程中how to install subway tile backsplash。
There are many variations ofhow to install subway tile, but this tutorial isfor the classic pattern。铺设瓷砖并不十分困难,但是tips and tricks will definitely help to make things easier…and make the end result looking professional. Enjoy!
 View in gallery
DIY级别:中级
 View in gallery
*Note: The author is an experienced, but not professional, home improvement enthusiast. Neither the author nor Homedit is responsible for any potential damages or harm caused during the process of following this tutorial.
 View in gallery
使用这些材料安装地铁瓷砖后挡板
- 瓷砖(经验法则:比平方英尺高10%)
- 乳胶(瓷砖粘合剂)
- 垫片
- Trowel and putty knife
- Tile saw (“snapper” manual tile saw or tile wet saw)
- 灌浆
- 浮子和平铺海绵
- 灌浆sealer
- 与灌浆相匹配的彩色沙填缝
How to Install Subway Tile Backsplash Step by Step
 View in gallery
Step One: Start from the bottom
Begin安装地铁瓷砖后挡板by laying out an old towel or sheet over your countertop for protection. Starting on the bottom row at an outer corner, wipe a layer of mastic onto the wall with a putty knife. Go slightly higher than the tile height.Tip: Work row by row in 3’-4’ sections for best results.
 View in gallery
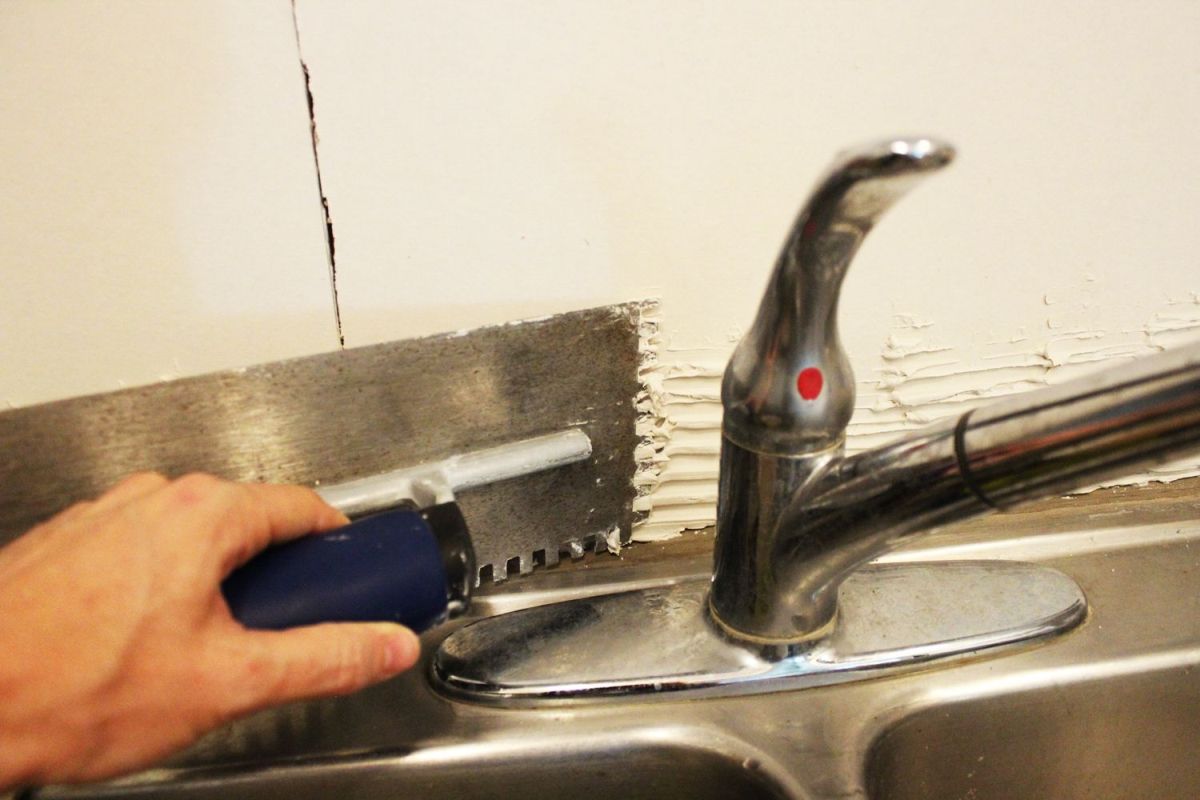
使用抹子齿来“评分”乳胶。这将有助于创造更好的依从性安装地铁瓷砖后挡板。
 View in gallery
Trowel marks should be in the same direction. This minimizes air pockets under the tile and keeps the tiling surface as level as possible.
 View in gallery
第二步:开始安装地铁瓷砖
Align your outer lower tile flush with the edge of your countertop, and press into the mastic.
 View in gallery
水平工作,放置第二个瓷砖。
 View in gallery
Step Three: Clean the mastic off
Clean out any mastic that has squeezed out between the tiles. A toothpick, old knife, or even a flat screwdriver works well for this.Tip: The mastic can be chipped off fairly easily after it’s dried, but it’s even easier to take care of before it’s had a chance to dry.
 View in gallery
Step Four: Place subway tile spacers
安装地铁瓷砖时,您需要在它们之间放置垫片。这确保了干净甚至灌浆线。Tip: Place two spacers per side of tile, about ½” to 1” away from each corner of the tile.
 View in gallery
第五步:确保地铁瓷砖是水平的
在进入第三次之前地铁瓷砖, check for level. Make any adjustments needed. This is a critical step, particularly for the bottom row of tiles, as it sets the foundation for the rest of the backsplash. You want it straight and flat!
 View in gallery
继续沿着底部行,在每个瓷砖之后检查级别,并根据需要进行调整。
 View in gallery
第六步:在水龙头后面安装地铁瓷砖
在厨房水龙头后面工作can be tricky, but do your best to reach the trowel teeth back behind the faucet from both sides.
 View in gallery
步骤七:第二个地铁瓷砖后挡板行
After completing the bottom row of地铁瓷砖s, you’ll be ready to start the second row. If you’re following the traditional subway tile layout, this means that you’ll start with a half tile from the outer edge. Measure halfway down your tile and mark with a pencil.
 View in gallery
Step Eight: Cutting the subway tile
Line up your halfway mark with the middle of amanual tile snapper, shiny side up. Push the blade along the line to score the tile – one pass should be sufficient.
 View in gallery
在不移动瓷砖的情况下,将瓷砖鲷鱼的脚压在瓷砖上。您的瓷砖应沿得分线分开…
 View in gallery
…to create two equal tile halves.
 View in gallery
Pay attention to where your cut edge is on your new half-tile piece. This will go on the inside edge of your row.
 View in gallery
Step Nine: Align with First Row of Subway Tiles
Line up the outer edge of your second row tile with the first row. You’ll need to be precise in your alignment for a successful tile lineup.Tip: Use a level for this, as eyes can be deceiving.
 View in gallery
步骤十:在插座周围安装地铁瓷砖
Wheninstalling the subway tilefor the second row, continue working from the outer edge toward the corner, row by row. When you approach an obstacle, such as an electrical outlet or light switch, measure the distance between the electrical box and the last地铁瓷砖laid. Subtract the length of your spacer (in this case, 1/8”), then mark a tile for cutting.
 View in gallery
沿着标记的线切开瓷砖。Tip: A tile wet saw makes this tile backsplash project much faster and easier…with better results than other methods of tile cutting. If at all possible, get your hands on a wet tile saw.
 View in gallery
If there is no mastic on the wall in your tile’s space, you can add mastic to the back of the tile and run the trowel teeth along the back of the tile itself.提示:始终以一个方向运行抹子齿。
 View in gallery
同样,请注意切割边缘。您将希望此边缘最接近插座或开关。提示:即使是最好的剪裁仍然比瓷砖的实际边缘更加尖锐,因此最好使它们尽可能地“藏起来”,例如隐藏在开关板下方。
 View in gallery
Step Eleven: Cutting notches in subway tile
You may run into places where the edge of your tile row doesn’t line up exactly with the edge of your outlet. This will require some notching in your tile. Measure and mark, then cut along the line one way.
 View in gallery
Turn your地铁瓷砖, and cut along the line the other way to complete the notch.
 View in gallery
You now have a crisp corner cut out of your地铁瓷砖。
 View in gallery
Step Twelve: Installing notched subway tile
在障碍物旁边安装此瓷砖。Add more mastic if need be. If you’ve measured and notched your tile correctly, it should fit perfectly.
 View in gallery
第十三步:在地铁瓷砖中切割正方形
You may run into a situation where a piece needs to be cut out of single tile – not just notches from the corners of two tiles. This is tricky. I cut along the two short edges, then stood behind the tile wet saw with the tile (shiny side up) and carefully cut the space between.提示:这样做必须非常非常谨慎;实际上,由于其风险,我无法推荐此策略。您将翻转安全保护人员,以这种方式切开瓷砖。稍后显示一个更安全,更慢的替代方案。
 View in gallery
Here is the tile with the piece cut out of the center.
 View in gallery
双灯开关盒上方的一个不错的合身。
 View in gallery
安装地铁瓷砖后挡板时要注意的东西
In the instance that the cut-out section of a single地铁瓷砖is smaller than the tile wet saw blade (or in the instance that you want to be safer in cutting your tiles), use a multifunction tool, also known as a Dremel, to score and cut the tile. A diamond blade will cut through the tile safely.Tip: Make the two perpendicular cuts with the tile wet saw first.
 View in gallery
如果切割不是笔直的,需要修剪一些剪裁,请使用一些瓷砖钳子来剪断多余的东西。
 View in gallery
那个内角是直截了当的。
 View in gallery
行行,从外边缘到角落工作,正在取得进展!
 View in gallery
It’s never a bad idea to use the level occasionally to make sure you’re on track. Probably with the spacers you’re doing just fine, but it’s a good idea to check before the mastic starts to harden.
 View in gallery
第四步:制作薄的地铁瓷砖后挡板
对于一排,将瓷砖纵向切成狭窄的条,在下方的全瓷砖行和上方的薄瓷砖行中涂抹乳胶。同时使用两排的箭头牙齿,因为您将没有足够的空间与抹子一起工作。
 View in gallery
Again, be aware of the cut edge. This time, you’ll want it directly under the cabinet edge because, let’s face it, no one ever sees there.
 View in gallery
Place the tile and the spacers.
 View in gallery
If you spread the mastic with the trowel teeth and find gap spaces, you’ll need to add a little more paste to that spot, then spread again with the trowel in the same direction.
 View in gallery
Mark the Tile When Cutting Subway Tiles for Backsplash
It’s not uncommon to get mixed up on which edge or corner you are supposed to be cutting.Tip: It helps to mark the tile, then hold it up to the spot where it goes to make sure you’re cutting out the right section.
 View in gallery
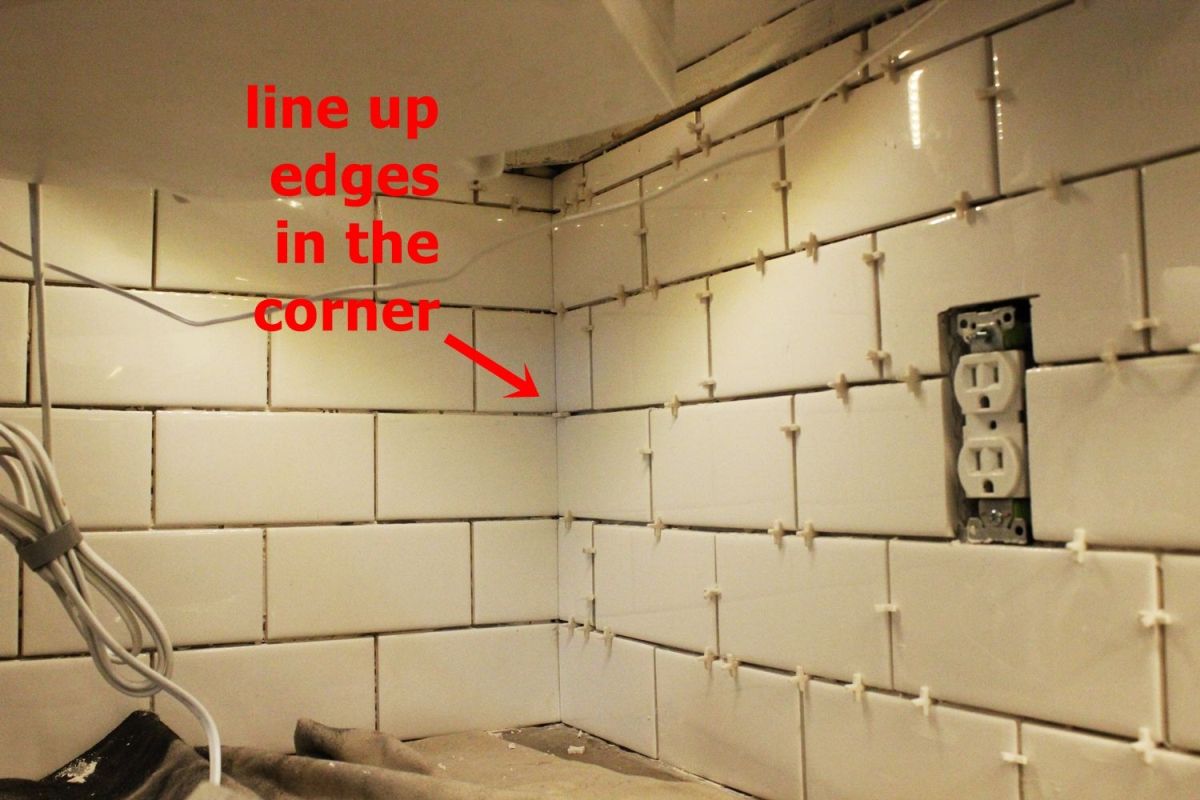
It is critical that, when two rows meet in a corner, they line up perfectly. This will work out if you’ve been keeping things level as you work your entire way down the rows toward the corner.
 View in gallery
当您无法使用抹子时
In the instance that you don’t have enough space to spread the mastic (tile adhesive) and mark it with the trowel teeth, such as behind a light fixture or cabinet-mounted radio or TV, you may need to work tile by tile.
 View in gallery
Lather the mastic on the back of the tile in about the thickness of the trowel teeth.
 View in gallery
将抹子穿过乳胶。
 View in gallery
小心地放置瓷砖并添加垫片。
 View in gallery
垫片在进来,事情看起来还不错。
 View in gallery
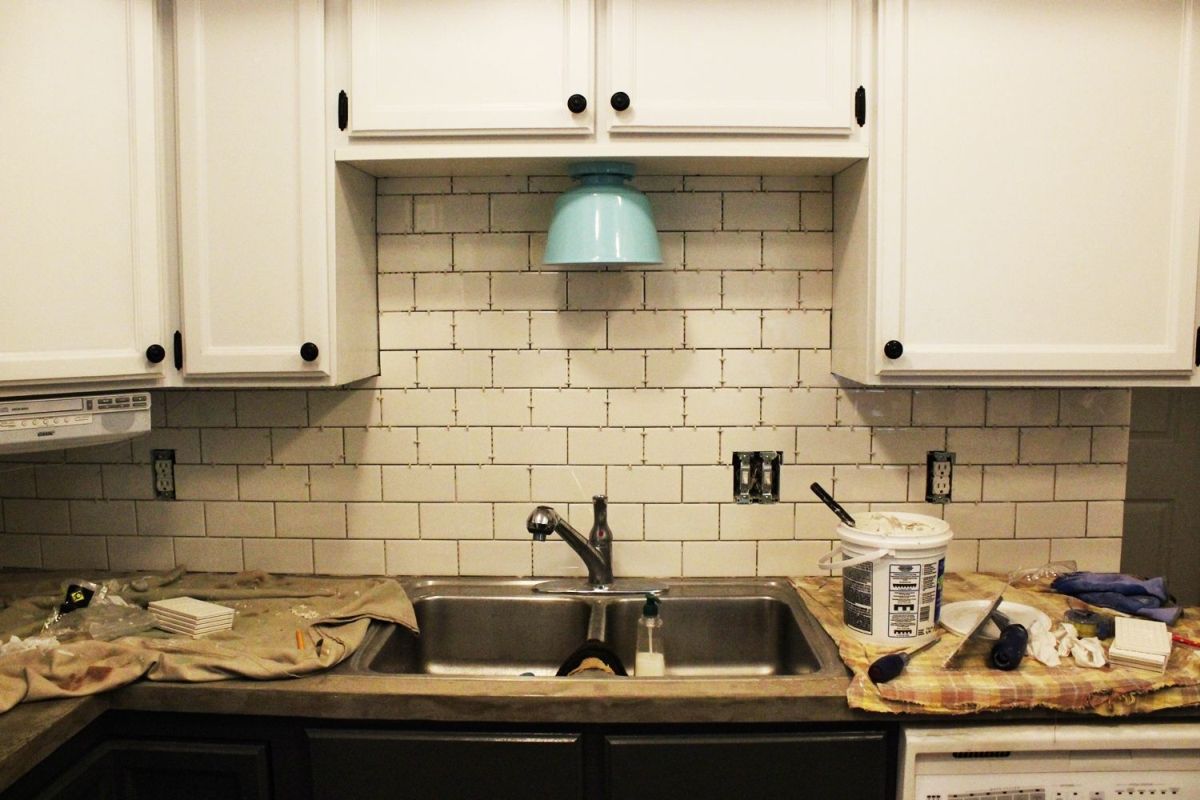
现在,您等待24小时才能彻底干燥。
 View in gallery
Step Fifteen: Grouting subway tile backsplash
Once the mastic has dried completely, it’s time to add the grout. Tape off any edges you don’t want the grout to go, such as the sides of adjacent cabinets.
 View in gallery
Also tape off any walls next to the subway tile backsplash.
 View in gallery
覆盖网点和电灯开关电气tape to protect them from the grout. It can be pretty drippy.
 View in gallery
第十六步:选择灌浆作为地铁瓷砖后挡板
Choose the color of grout you want. Here is where you can really make things your own – from white to grey to black to any color you want. Choose something that will stand the test of time for your style.
 View in gallery
You’ll also need a tile float and a couple of large tiling sponges.
 View in gallery
第十七步:混合灌浆
遵循灌浆包装上的指示,加水并彻底搅拌。
 View in gallery
You want the consistency to be not runny, similar to peanut butter.
 View in gallery
Step Eighteen: Spread grout over subway tiles
使用瓷砖浮子将灌浆应用于每个瓷砖空间。
 View in gallery
第十九步:从地铁瓷砖后挡板上擦洗灌浆
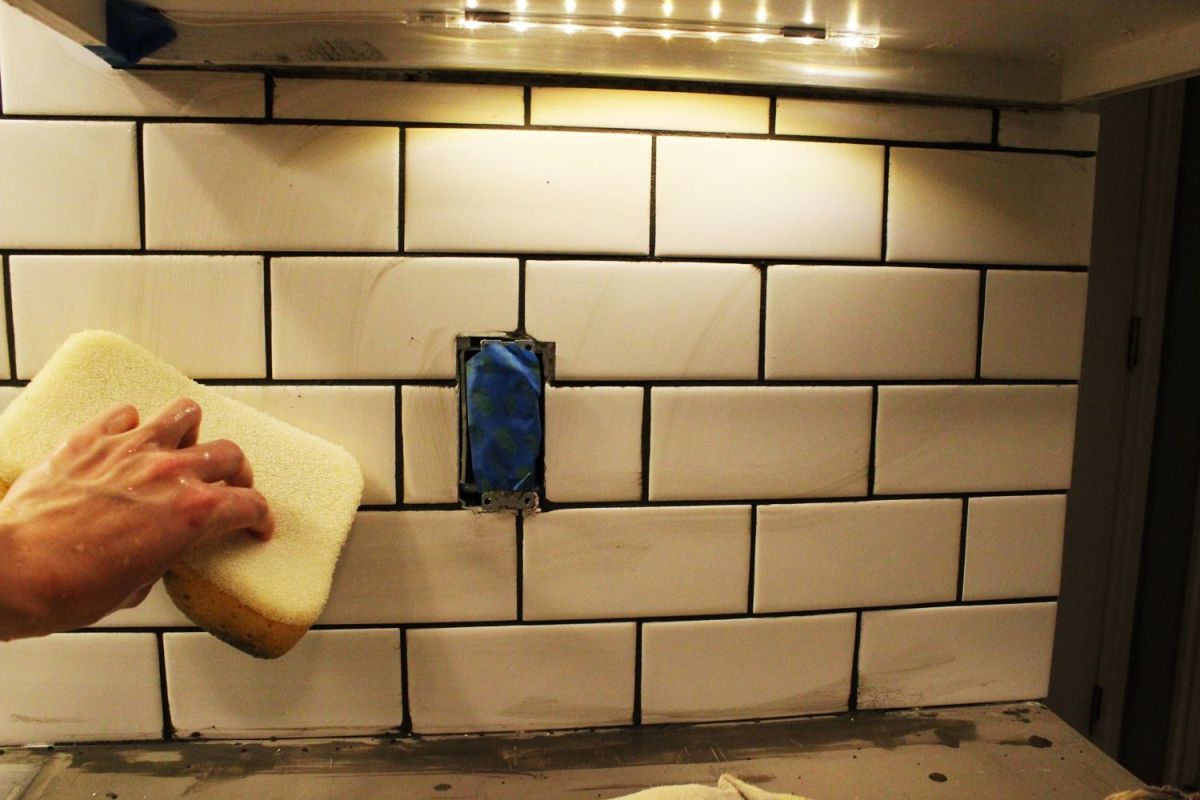
在2’-3的部分工作,在您仔细地将灌浆应用于所有瓷砖空间之后,是时候从瓷砖本身中散发出灌浆了。弄湿海绵,拧干大部分水。
 View in gallery
开始擦拭灌浆。
 View in gallery
这是一件混乱的工作。您将不得不多次冲洗海绵。
 View in gallery
Get the tiles mostly cleaned off, then leave it alone. You’ll be able to clean off the tiles completely after the grout sand has dried. If you keep wiping and wiping with the wet sponge, you’ll start to pull grout out of the tile spaces, which is obviously counter-productive.
 View in gallery
This photo shows one section of tile after being wiped off one time.
 View in gallery
This tile has been wiped twice.
 View in gallery
该瓷砖已经被擦了四次。
 View in gallery
该瓷砖已被擦过六次,这是最后一次带有海绵的毛线侧。
 View in gallery
用于将灌浆涂在地铁瓷砖后挡板上的提示
When you spread the grout on with the float, you’ll want to apply pressure into the tile spaces themselves. The goal is to squeeze grout completely into these spaces to prevent cracking and flaking over time. You should also run the float over the grout lines from multiple directions, to make sure each side of the grout adheres to the adjacent tile’s edge.
 View in gallery
Notice how the float streaks are going in multiple directions? That’s a good thing; it means the grout has been applied in multiple directions, and the tile spaces are completely filled.
 View in gallery
Step Twenty: Final wipe of subway tile backsplash
在使灌浆完全干燥之前,请使用海绵的毛衣侧进行最后的擦拭。
 View in gallery
This side of the sponge wipes the tiles clean while leaving most of the grout in the spaces. Again, don’t worry about getting it completely clean right now, though. There will be time for that after the grout dries.
 View in gallery
Stand back and admire your handiwork. The grout will be darker at this point than when it is dry, so if it looks too dark right now, don’t worry.
 View in gallery
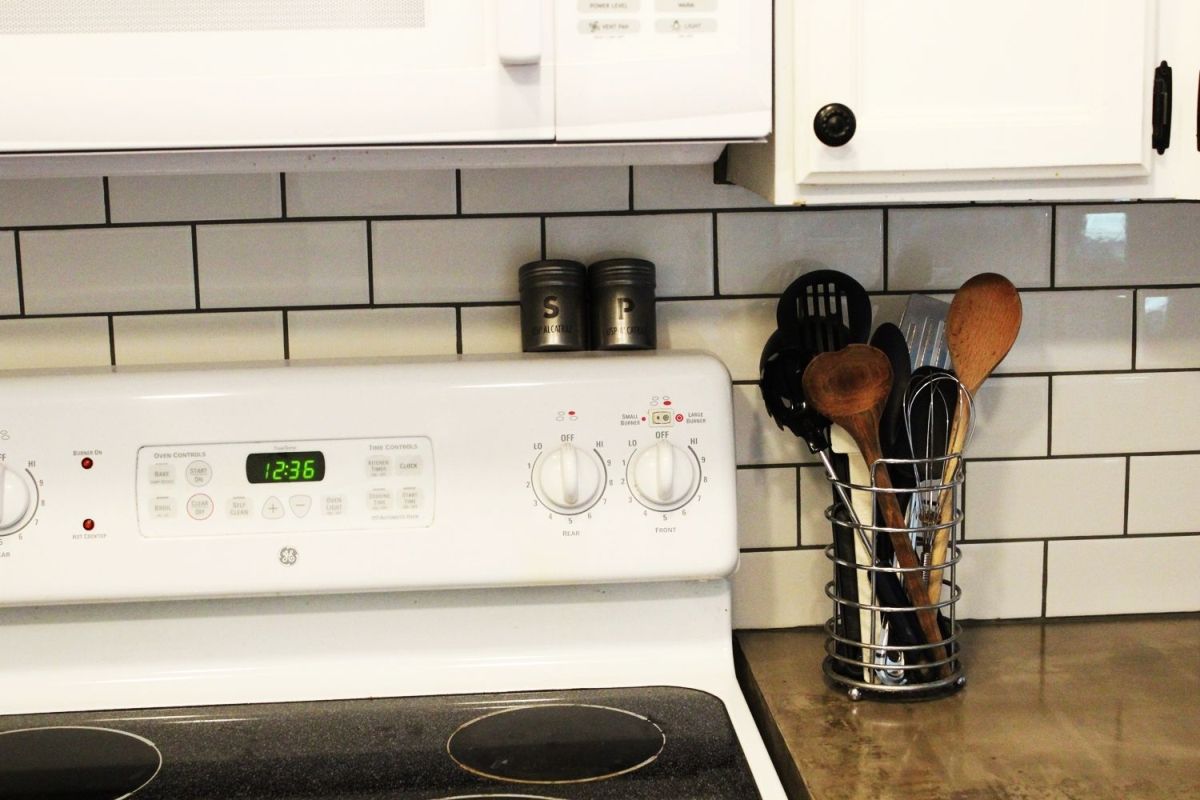
Subway tile backsplashesare so classically beautiful.
 View in gallery
As a simple pattern and light color, they are a perfect choice for any kitchen, particularly one that is small and lacking natural light from windows.
Step Twenty One: Apply grout sealer to subway tile backsplash
 View in gallery
Let the grout dry at least 48 hours before applying grout sealer.
 View in gallery
当您的灌浆完全干燥时, it is time to apply grout sealer. This sealant will help to lengthen the life of your grout and keep it looking clean and fresh.
 View in gallery
浸入泡沫刷or soft-bristled paint brush into the grout sealer, then apply it carefully onto your grout lines. Work in a systematic pattern (e.g., one horizontal line and the above vertical lines) so you can keep track of what you have sealed and what still needs sealing.
 View in gallery
Every minute or so, wipe off all excess sealer from the tiles’ surfaces with a paper towel. The sealer will leave a residue on your tiles that’s much harder to get off when it has dried, so wipe it off when it’s still wet.
 View in gallery
Let your sealer dry (as per instructions) before applying a second coat, if desired.
 View in gallery
步骤22:更换插座盖
While the grout sealer is drying, you can replace your outlet covers. With the addition of tile onto your backsplash, your wall surface has likely been pushed “out” a ways. In order for your outlets to lie flush with the new tiled wall surface, you will need to add spacers. These are plastic strips that can be folded and cut to the desired width, then placed between the outlet itself and the electrical box in the wall.
 View in gallery
确保在进行任何电气工作之前关闭了插座的电力,然后继续拧下插座或开关,然后将所需的垫片数放在螺钉后面。
 View in gallery
根据现在需要的插座和开关的间隔数,您可能需要比标准长度更长的螺钉。这些可在您当地的家居装修商店,在插座和开关所在的地方的电气部门中找到beplay平台没信用。如果您需要超过三个或四个垫片,这些都可以节省您的生命。
 View in gallery
更换固定装置(在这种情况下,显示了电缆板)。此步骤实际上包括重新安装插座或开关,螺丝长度完好无损地安装到框架内的蓝色电盒上,然后重新安装面板。根据需要清理插座和面板。
 View in gallery
Step Twenty Three: Caulking subway tile backsplash
When your tile grout has fully dried, you are ready to apply caulk. I recommend sanded ceramic caulk that is available in the same colors as the grout itself (this tutorial uses 09 Natural Gray in both grout and caulk).
 View in gallery
Snip the tip of your caulk bottle off at an angle, then place it in the caulk gun. Begin your caulking in an area less visible (such as in a far corner, or behind the refrigerator, or beneath the upper cabinets), so you can get the hang of it before moving on to highly visible areas.
 View in gallery
Lay a thin strip of caulk along the edge of your tile backsplash. This includes the edges between the countertop, the upper cabinets, and the walls.
 View in gallery
沿填缝剂运行湿的手指。这里的目标是将填缝的边缘密封到它接触的两个表面。尽量避免让填缝挤出。如果您有很多过剩,请记住下次在脱衣舞中少填缝。
 View in gallery
Wipe off any excess from the adjacent surfaces (e.g., tile and countertop, in this case). Allow caulk to dry.
 View in gallery
恭喜!您刚刚安装了一个漂亮的地铁瓷砖厨房后挡板。
 View in gallery
It was a lot of work, but we hope you think it was well worth it.
 View in gallery
这个简单的经典后挡板是如此的用途,从设计方面。
 View in gallery
And, unlike many trends or fads, a subway tile backsplash in the kitchen will stand the test of time.
 View in gallery
 View in gallery
我们喜欢一个新的吸引力white subway tilekitchen backsplash.
 View in gallery
优雅,但友好,简单。
 View in gallery
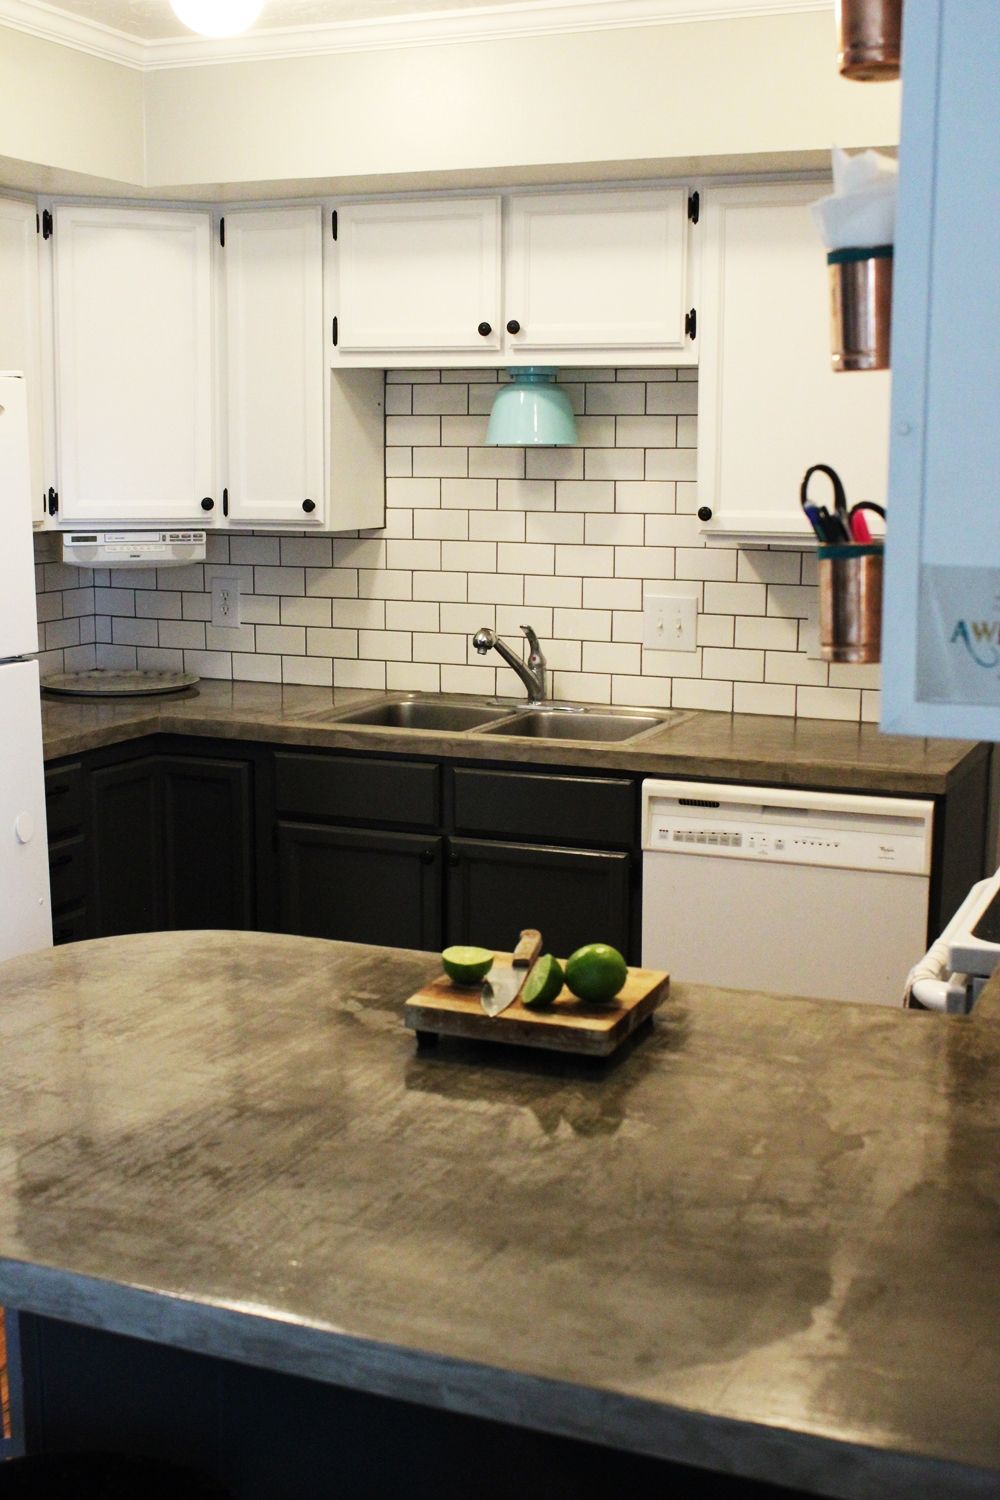
地铁瓷砖后挡板与concrete countertops。
 View in gallery
Enjoy your gorgeous “new” kitchen!