DIY Rustic Heart Garland To Hang On The Walls or Windows
It’s February, which means thatValentine’s Day几乎是在这里。这个节日是一个有趣的DIY and/or home decorating world – the thematic décor is sweet and relatively simple. This DIY rustic heart window garland is no exception. I love the earthy simplicity of the garland. Plus, you can throw this one together in about an hour or two, depending on drying time. Now, that’s true love.
 View in gallery
 View in gallery
Speaking of true love: that’s exactly whatthis DIY projectis. It’s incredibly customizable; you can pretty much shop your house for the materials needed, and it’s very sweet and aesthetic in its finality. Plus, it just adds a festive touch to any window, wall, or gap.
 View in gallery
 View in gallery
Materials you’ll need for the heart garland:
- Tree bark wood slices, various sizes
- Acrylic paint
- Baker’s twine
- Miscellaneous craft objects of your choice (many objects are shown in this photo, but the only ones used in this project are: washi tape, red-and-white gingham strips, jingle bells)
- Drill with 1/8” drill bit
How to build the rustic heart garland:
 View in gallery
Step 1: Prepare the wood slices
To begin, you’ll want to prepare your wood slices for hanging. This includes drilling holes in each slice to be able to hang it onto the garland.
 View in gallery
Use a 1/8” drill bit (or whatever size is appropriate for your hanging string), and drill a hole about 1/4″ to 1/2” from the bark edge.
 View in gallery
Drill a second hold directly across from the first one, so it hangs evenly and straight.
 View in gallery
做你想要尽可能多的木头片。的有限公司urse, this will be entirely a personal choice, based upon your space, preferences, and wood slice sizes, but a good rule of thumb is to plan on about three wood slices for every two feet of garland.
 View in gallery
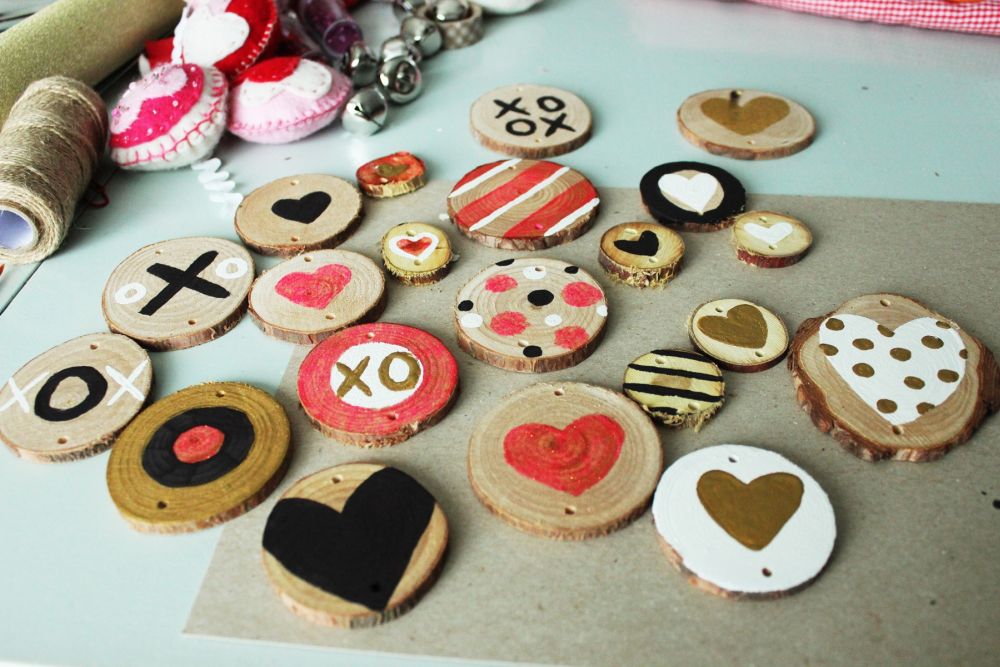
Step 2: Painting process
Wipe off the sawdust from drilling, and pull out your acrylic paints. Time to decorate these just how you want them!
 View in gallery
Be creative with your shapes and designs. I enjoyed using some metallic and glittery acrylic paints, because they provided sparkle and shine while still letting the wood grain show.
 View in gallery
One tip to maintaining this garland’s rustic appeal while still making it appropriate for Valentine’s Day is to keep the color palette fairly tight. Glitter neon pink was the only “color” I used for the paints; white, gold, and soft black were other neutral colors of paints used.
 View in gallery
Step 3: Add the twine
When the paint is completely dry, it’s time tostart forming your garland. This is the fun part! Tie baker’s twine onto the drilled holes in your wood slices, and continue the twine with other objects of your choosing.
 View in gallery
Snip the extra twine off your knot end, so it’s about 1/2″ long.
 View in gallery
Step 4: Hanging
You can simply attach these garlands to your window sill, or you can hang them on a hanging branch, which has become one of my family’s favorite multi-holiday decorating tools (seehow to install a similar one here).
 View in gallery
I recommend laying each garland out as you’re working on the next one, so you can stagger the objects and wood slices and spacing and what-not.
 View in gallery
The mini-checked gingham fabric were simply 3/4″ wide strips, about 6”-7” long, tied around the baker’s twine.
 View in gallery
I tried to stagger the objects and spacing. Once or twice, I placed two wood slices on top of each other, but generally I placed a different object (e.g., bell, washi tape, or gingham strip) between the wood slices to give it some variety.
 View in gallery
One of my favorite aspects of this decoration is that every glance paints a different picture. The strings spin a bit with the slightest breeze, which is fun.
 View in gallery
The rustic heart window garland looks great in our peekaboo space between the entryway and the living room. It would look just as well hanging in any window or along a wall, too, although the wall would give it less “spinnability.”
 View in gallery
Don’t be too precious in your measurements between objects. Its variation is part of its rustic charm, trust me.
 View in gallery
Wash tape was simple folded in half over the baker’s twine, then trimmed to look like a flag.
 View in gallery
Other objects you could consider using, if you had them on hand, are: wooden beads, gold bangle bracelets, simple ornaments, ribbons, pom-poms, woolen felt balls, wooden cut-outs of other shapes (such as hearts, since it is Valentine’s Day décor, after all), and whatever else brings you joy.
 View in gallery
Happy Valentine’s Day DIYing.