DIY粗麻布and Felt Valentine’s Day Banner
Are you ready to make a delightful, cheerful, and very simple burlap (and felt) Valentine banner? You can make one of these Valentine’s Day decorations in a very short amount of time.

This tutorial will show youhow to create the burlap piecesand the banner itself; for the felt “cookies” shown here, you can make your own, find something similar, or use something completely different (like wooden hearts, bells, red gingham strips, ribbons, etc.) between the burlap flags.

The end result, like allDIY projects, can be completely customized to suit your preference and space. Above all, we hope you’re pleased with the result and the Happy Valentine’s Day aura that it evokes!

Materials you’ll need for Valentine’s Day Banner:
- Burlap
- Acrylic paint (example uses warm white and glitter neon pink)
- Foam pouncer
- Twine
- Hot glue gun
- Felt Valentine decorations + safety pins (optional; can be substituted with other seasonal hang-able décor)
How to craft Valentine’s Day Banner:

How to (Correctly) Cut Burlap
There’s a method for cutting burlap that will never lead you astray. Burlap is known for its inconstancy in right-angle shaping, so it might seem impossible to get your cuts aligned correctly. Never fear!

On this piece of burlap, I needed to cut off the angled bit at this end. To do so, I snipped about 1/2″ in from the edge with some sharp multi-purpose scissors. (Tip: Don’t use fabric scissors on burlap. It’s too rough on them.)

Then, pull on the nearest perpendicularly-running thread. It might start to pucker the rest of the burlap; that’s okay. Keep pulling it toward you, carefully, until the entire thread itself detaches from the burlap and comes out.

你会留下了一个空间,或者“,”the burlap at the position where the removed thread had been. This is your new cutting guide.

Cut along this lane with your sharp (non-fabric) scissors. Congratulations. You are now assured of a right-angle cut, no matter how skewed the burlap my appear when lying flat.
Burlap Banner Pieces
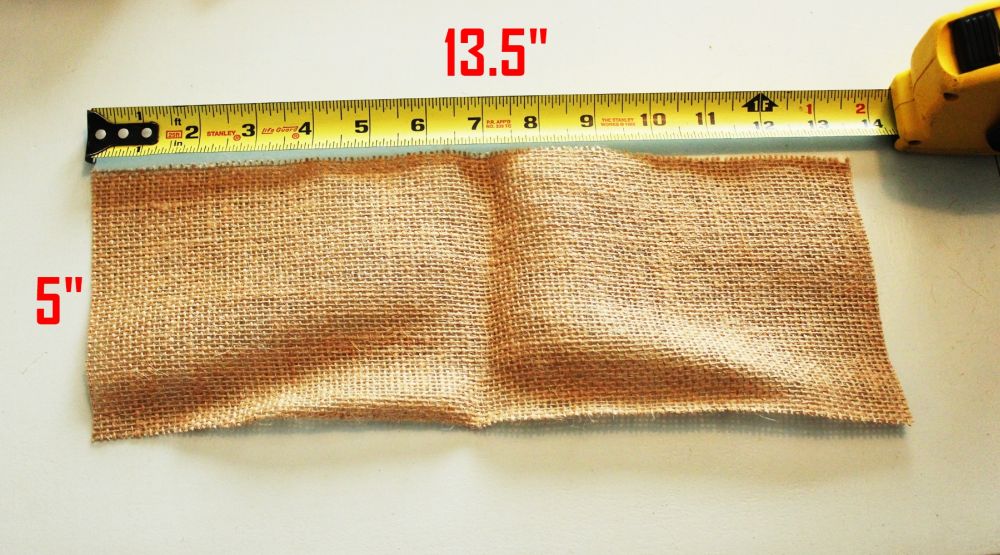
It’s now time to create your burlap banner flags, or whatever you call them. Using the method above, cut four rectangular pieces out of burlap about 5” x 13.5”. You can actually size these however you want, but this is the size used in this example banner.

Find center along the long edge. Now measure (or eyeball) 3/4″ on either size of center. These will be the points of your flags – one will be what’s called a dovetail shape (the one with two points on the outside end), and the other will have the triangular end, with one point at the middle. Gently fold your rectangle in half long-wise (aka “hot dog style”), and cut at an angle from one 3/4″ measuring point to the other. Open the burlap back up. Your flags should look something like this, each about 1-1/2” deep from point to corner. Repeat for all rectangles.

Next, lay your eight flag pieces on a protective painting surface, such as newspaper, cardboard, or a drop cloth. Mine were pretty wrinkled, so I wet them down. (I’m lazy when it comes to ironing. Sorry.) This didn’t impact the outcome of the next few steps at all; it just made the paint-drying phase take longer, that’s all. But by all means, iron your flags if you want.

Pour some acrylic paint in the color(s) of your choice onto a disposable plastic lid.

Grab your foam pouncer. This example uses a 1-1/4” diameter pouncer, although you can choose whatever size makes you happy.

Dip your foam pouncer into the paint.

Press it firmly, straight down, onto your burlap flag piece.

Remove the pouncer from the burlap in a straight-up direction, so the paint doesn’t smear or smudge. Repeat until entire flag is painted satisfactorily. (If you’re thoroughly enjoying using your foam pouncer in this way, check out how to use one to create a fantasticpolka dot tablecloth!)

This example uses two colors to paint the burlap flags; one color per shape. Warm white was used on all the block-triangle-shaped flags; glitter neon pink will be used on all the dovetail-shaped flags. Let the paint dry thoroughly.

You can make the banner just out of the burlap flags (which would look simple and lovely), or you can interject some other objects in between the flags. This tutorial includes some handsewn stuffed felt Valentine “cookies,” which you could also make followingthis guide for basic hand stitches.

A cheater way to get any type of fabric object ready to string onto a piece of string or twine is to simply attach a safety pin onto the back, vertically and upside down. Easy!

When your flags are dry, remove them from the cardboard. Do this carefully so they maintain their shape. The painted parts will be slightly stuck to the cardboard, but they shouldn’t be hard to peel up.

Lay out your burlap flags and felt Valentine’s “cookies” (or whatever decoration you have or want to use; consider wooden hearts or some bells for an easy inclusion) in the order that you want them.

Once you’re satisfied with your arrangement, it’s time to create the actual banner. Plugin yourhot glue gunnow.

Cut a piece of string or twine – whatever you’re going to use to hang your banner on; this example uses jute twine – about 1.5x-2x the length that you’ll actually want. I find it’s always easiest to err on cutting too long at first; you can always trim it down later.

Find the center of your twine.

Tie a single knot to mark center.

Thread one end of your twine through the hole in your safety pin, and pull the twine all the way through until the safety pin reaches your center knot.

Tie another knot on the other side of your safety pin to keep it in place. (Do this for every safety pin that you use on your banner, to keep it in the correct position on the banner.)

Next, it’s time to place a flag on the side of your felt piece. Fold about 1/2″ to 3/4″ down from the top of your burlap. This will help you attach the flag more quickly, easily, and accurately to the twine when it comes time to hot glue.

Place a bead of hot glue along the twine that will go inside the flag. (Note: FYI: This example spaces about 4” between each flag end and felt piece, to help you reference where to run your glue line.)

Quickly and carefully lay the gluey twine piece inside your burlap crease, and fold over the top. .

Press your fingers all along the burlap fold, over the twine, until the glue has set. (Note: You may find this easier to do by picking up the burlap and holding it up in the air, so the glue doesn’t squeeze out and dry on the front of your burlap in patches, although if this is happening, you should probably decrease the amount of hot glue on your twine.)

Supplement the ends of your burlap flag with some glue, as needed, to keep them secured flat.

Continue working along your twine to create your banner.

This example alternated flag-felt-flag (other shape)-felt, etc.

When you’re done attaching all the components to the twine, it’s time to hang it up!

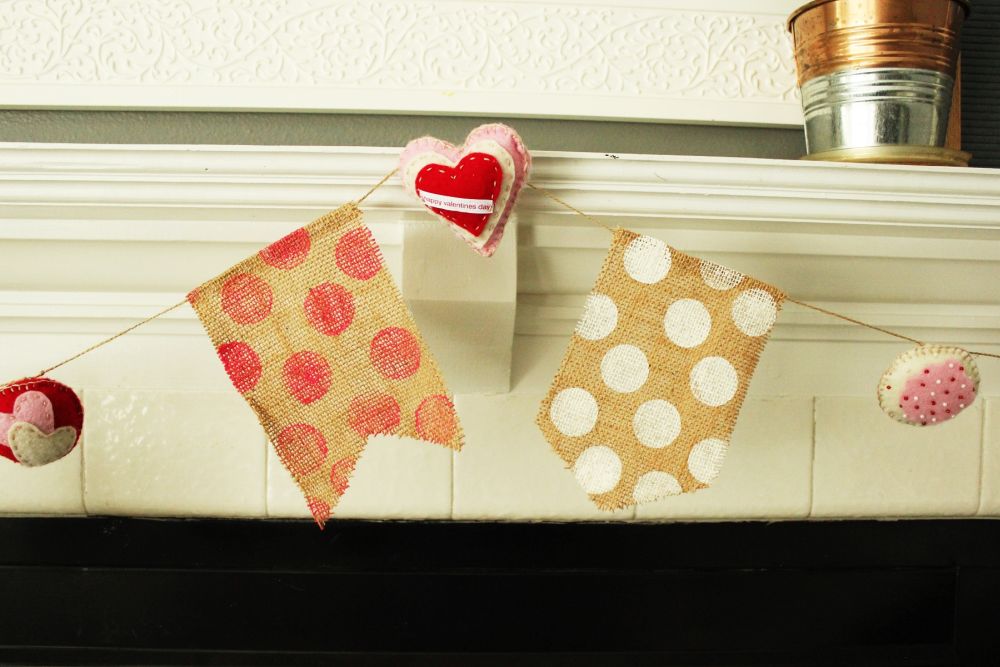
Holiday banners like this DIY burlap Valentine banner always look greathanging from a mantel. Other ideas include: in a window, on a wall, around a door, on a stair railing…the possibilities are vast, actually.

I like having plenty of blank space on this banner; it gives it a more contemporary feel, even with the rustic burlap and hand-sewn felt aspects.

Polka dots are such a fun, festive touch to almost every seasonal décor. I’m finding myself incorporating polka dots into many DIYs.
You could do a single drape on your banner, or you could raise the center for two drapes; you could even raise the 1/3 points from the ends to create a small drape-large drape-small drape “curtain” effect. Have fun with this!

I don’t have a lot ofValentine’s Day décorset up this year, but this burlap garland provides plenty of thematic color and lovable fun.

Happy Valentine’s DIY-day!